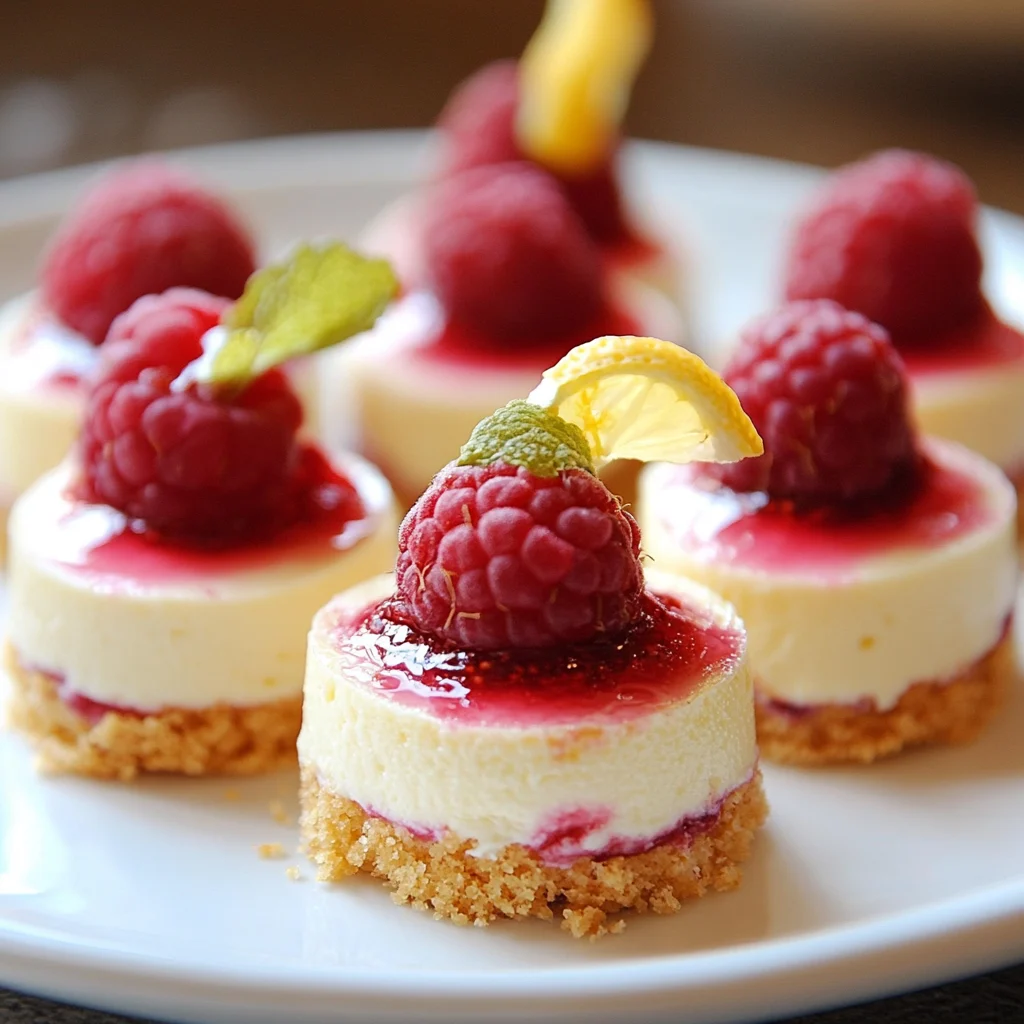
No-Bake Mini Lemon Raspberry Cheesecakes

Description of this recipe: These No-Bake Mini Lemon Raspberry Cheesecakes are the perfect individual desserts for any occasion. Tangy lemon complements the sweet raspberries, all nestled on a buttery graham cracker crust. The creamy, dreamy filling requires no baking, making these a breeze to prepare.
Why you will love this recipe:
- Effortless Elegance: These mini cheesecakes look impressive but require minimal effort. Perfect for entertaining or a special treat.
- No-Bake Bliss: Skip the oven! This recipe is ideal for warm weather or when you’re short on time.
- Flavor Explosion: The combination of tart lemon, sweet raspberries, and rich cream cheese is a symphony of flavors in every bite.
- Customizable: Easily adapt the recipe to your preferences. Try different berries or add a swirl of lemon curd.
- Perfectly Portioned: Each mini cheesecake is a satisfying single serving, making them ideal for portion control.
Introduction
Summer calls for light, refreshing desserts, and what could be more delightful than a mini cheesecake bursting with citrusy and fruity flavors? These No-Bake Mini Lemon Raspberry Cheesecakes are a showstopper, both in taste and appearance. The buttery graham cracker crust provides a sturdy base for the creamy lemon-infused filling, studded with juicy raspberries. The best part? They require no baking, making them an ideal dessert for any skill level. This recipe is not just about making a dessert; it’s about creating an experience, a burst of sunshine on your palate, and a guaranteed crowd-pleaser. Get ready to indulge in a dessert that’s as easy to make as it is heavenly to eat! These mini cheesecakes will have you coming back for more.
Ingredients:
- 1 cup graham cracker crumbs
- 3 tbsp butter, melted
- 8 oz cream cheese, softened
- 1/2 cup powdered sugar
- 1/4 cup lemon juice
- 1 tsp vanilla extract
- 1 cup heavy cream
- 1/2 cup fresh raspberries
Preparation:
Step 1: Prepare the Graham Cracker Crust
In a medium bowl, combine the graham cracker crumbs and melted butter. Mix well until the crumbs are evenly moistened. The mixture should resemble wet sand.
Step 2: Assemble the Crust in Mini Cheesecake Pans
Divide the graham cracker crumb mixture evenly among the mini cheesecake pans or cupcake liners (if using a muffin tin). Press the crumbs firmly into the bottom of each pan to create a compact crust. A small measuring cup or the back of a spoon can be helpful for this. Once pressed, place the prepared crusts into the freezer to chill while you prepare the filling. This helps the crust to set and prevents it from crumbling when you add the filling. Chilling time in the freezer, a minimum of 15 minutes, but can stay in there longer.
Step 3: Make the Cream Cheese Filling
In a large mixing bowl, beat the softened cream cheese and powdered sugar together using an electric mixer until smooth and creamy. Ensure there are no lumps for the perfect texture. This usually takes 2-3 minutes on medium speed. It is important that the cream cheese is properly softened so that you don’t end up with a lumpy filling. Scrape down the sides of the bowl with a spatula to ensure that everything is evenly incorporated.
Step 4: Add Lemon Juice and Vanilla Extract
Add the lemon juice and vanilla extract to the cream cheese mixture. Beat again until well combined. The lemon juice not only adds a bright, citrusy flavor, but also helps to thin out the cream cheese mixture, making it easier to fold in the whipped cream later. The vanilla extract enhances the overall flavor of the cheesecake.
Step 5: Whip the Heavy Cream
In a separate clean bowl, beat the heavy cream using an electric mixer until stiff peaks form. It’s crucial to use cold heavy cream for this step to ensure it whips up properly. Start on low speed and gradually increase to high speed. Be careful not to overwhip the cream, as it can turn into butter. Stiff peaks should hold their shape when the beaters are lifted.
Step 6: Gently Fold in Whipped Cream
Gently fold the whipped cream into the cream cheese mixture in two additions. Be careful not to deflate the whipped cream, as this will make the filling less light and airy. Use a spatula and fold from the bottom up, rotating the bowl as you go.
Step 7: Fold in Raspberries
Gently fold in the fresh raspberries. Be careful not to crush the berries, as this will turn the filling pink. Distribute them evenly throughout the mixture.
Step 8: Fill the Crusts
Remove the chilled crusts from the freezer. Spoon the cream cheese filling into the crusts, filling them to the top. Smooth the surface of each cheesecake with the back of a spoon or a spatula.
Step 9: Chill the Cheesecakes
Cover the mini cheesecakes with plastic wrap or place them in an airtight container. Refrigerate for at least 4 hours, or preferably overnight, to allow the filling to set completely.
Step 10: Garnish and Serve
Before serving, garnish the mini cheesecakes with additional fresh raspberries, a sprinkle of graham cracker crumbs, or a lemon zest.
COOKING Rating:
Easy
Serving Suggestions:
- Serve chilled as a refreshing dessert.
- Pair with a dollop of whipped cream or a drizzle of raspberry sauce.
- Garnish with fresh mint leaves for an extra touch of elegance.
- Serve alongside a cup of coffee or tea.
- Perfect for parties, potlucks, or any special occasion.
Tips:
- Use full-fat cream cheese for the best flavor and texture.
- Make sure the cream cheese is softened to room temperature before mixing.
- Don’t overmix the cream cheese filling, as it can become runny.
- Chill the cheesecakes for at least 4 hours to allow the filling to set completely.
- Store leftover cheesecakes in the refrigerator for up to 3 days.
- For a richer flavor, add a tablespoon of lemon zest to the cream cheese filling.
- Experiment with different berries, such as blueberries, strawberries, or blackberries.
- If you don’t have mini cheesecake pans, you can use a muffin tin lined with cupcake liners.
Prep Time:
20 minutes
Cook Time:
0 minutes
Total Time:
4 hours 20 minutes (including chilling time)
Nutritional Information:
(per mini cheesecake, approximate)
Calories: 250 kcal
Protein: 3g
Sodium: 150mg
Conclusion
These No-Bake Mini Lemon Raspberry Cheesecakes are a delightful treat that’s perfect for any occasion. The combination of creamy, tangy, and sweet flavors is irresistible, and the no-bake aspect makes them incredibly easy to prepare. Whether you’re hosting a party or simply craving a delicious dessert, these mini cheesecakes are sure to impress. So, gather your ingredients, follow the simple steps, and get ready to indulge in a little slice of heaven!
Questions and Answers:
Q1: Can I use frozen raspberries instead of fresh ones?
A: While fresh raspberries are recommended for the best texture and flavor, you can use frozen raspberries if necessary. Make sure to thaw them completely and pat them dry before folding them into the filling. This will help prevent the filling from becoming too watery. Be aware that frozen raspberries may bleed their color, slightly tinting the filling.
Q2: Can I make these cheesecakes ahead of time?
A: Absolutely! These cheesecakes are perfect for making ahead of time. In fact, chilling them overnight is recommended for the best flavor and texture. Store them covered in the refrigerator for up to 3 days.
Q3: I don’t have mini cheesecake pans. Can I use something else?
A: Yes, you can use a muffin tin lined with cupcake liners. This will give you a similar portion size. You can also make one large cheesecake in a springform pan, but you’ll need to adjust the chilling time accordingly.
Q4: Can I substitute the graham cracker crust with something else?
A: Yes, you can substitute the graham cracker crust with other crushed cookies, such as vanilla wafers or Oreo cookies. Just make sure to adjust the amount of melted butter accordingly. You can even use a pre-made graham cracker crust to save time.
Q5: What can I use instead of lemon juice if I don’t have any?
A: If you don’t have lemon juice, you can use lime juice as a substitute. The flavor will be slightly different, but it will still add a nice tang to the cheesecake filling. You can also use lemon extract, but be careful not to use too much, as it can be overpowering. Start with 1/2 teaspoon and adjust to taste.