Step 1: Prepare the Cake Batter and Color It
Begin by preheating your oven according to the instructions on your white cake mix box. Grease and flour a 9x13 inch baking pan (or spray with baking spray).
In a large bowl, prepare the white cake mix according to the package directions. Once the batter is smooth, divide it evenly into separate bowls – the number of bowls should match the number of pastel colors you plan to use.
Add a few drops of gel food coloring to each bowl, one color per bowl. Gently stir until the color is evenly distributed throughout the batter. Remember, a little food coloring goes a long way, so start with a small amount and add more until you achieve your desired pastel shade. Avoid overmixing the batter at this stage, as it can toughen the cake.
Step 2: Create the Marbled Effect and Bake the Cake
Pour spoonfuls of each colored batter randomly into the prepared baking pan. Then, using a skewer or a butter knife, gently swirl the batters together to create a marbled effect. Be careful not to overmix, as this will blend the colors together too much and result in a muddy appearance. You want distinct swirls of color to be visible.
Bake the cake according to the package instructions. The cake is done when a toothpick inserted into the center comes out clean.
Step 3: Poke Holes in the Cake
Once the cake is baked, remove it from the oven and let it cool slightly for about 10-15 minutes. This allows the cake to firm up a bit, making it easier to poke holes without it crumbling.
Using the end of a wooden spoon, the back of a fork, or a straw, poke holes all over the cake, about an inch apart. The holes should go almost all the way to the bottom of the cake, but not completely through. The more holes you poke, the more pudding will seep into the cake, resulting in a moister and more flavorful dessert.
Step 4: Prepare the Pudding and Pour It Over the Cake
In a large bowl, whisk together the instant vanilla pudding mix with the milk until smooth. Continue whisking for about 2 minutes until the pudding begins to thicken slightly. It's important to use instant pudding mix for this recipe, as it will set up quickly and prevent the cake from becoming soggy.
Pour the pudding evenly over the cake, making sure to fill all the holes. Use a spatula to spread the pudding over the entire surface of the cake, ensuring that it seeps into every nook and cranny.
Step 5: Chill the Cake and Add the Topping
Cover the cake with plastic wrap and place it in the refrigerator to chill for at least two hours, or preferably longer. Chilling allows the pudding to set completely and the flavors to meld together, resulting in a more cohesive and flavorful cake.
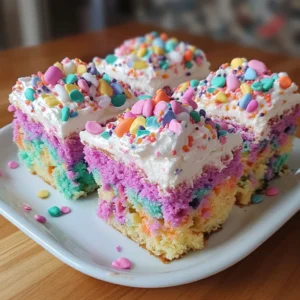
Once the cake is thoroughly chilled, spread the thawed Cool Whip evenly over the top. If you prefer, you can use homemade whipped cream instead of Cool Whip for a less sweet option.
Finally, sprinkle the cake with Easter-themed sprinkles for an extra touch of festivity. You can use pastel-colored sprinkles, edible glitter, or any other decorations that you like.
Step 6: Serve and Enjoy!
Keep the cake refrigerated until ready to serve. When serving, slice the cake into squares and enjoy the delightful combination of moist cake, creamy pudding, and light whipped topping.